


Step-by-step guide: Track your monthly Azure spending with Microsoft Cost Management

Table of Contents
Managing cloud costs effectively is crucial for any organization leveraging Azure. Without proper visibility, spending can quickly spiral out of control. Fortunately, Microsoft Cost Management provides powerful tools to track, analyze, and optimize your Azure expenditures.
This guide will walk you through the essential steps to monitor your monthly Azure spending, ensuring your organization stays within budget and identifies opportunities for cost savings.
Step 1: Accessing Microsoft Cost Management in the Azure portal
The first step is to navigate to the Cost Management + Billing section in the Azure portal.
How to do it:
- Sign in to the Azure portal: Go to portal.azure.com.
- Search for “Cost Management + Billing”: In the search bar at the top of the portal, type “Cost Management + Billing” and select the relevant service from the results.

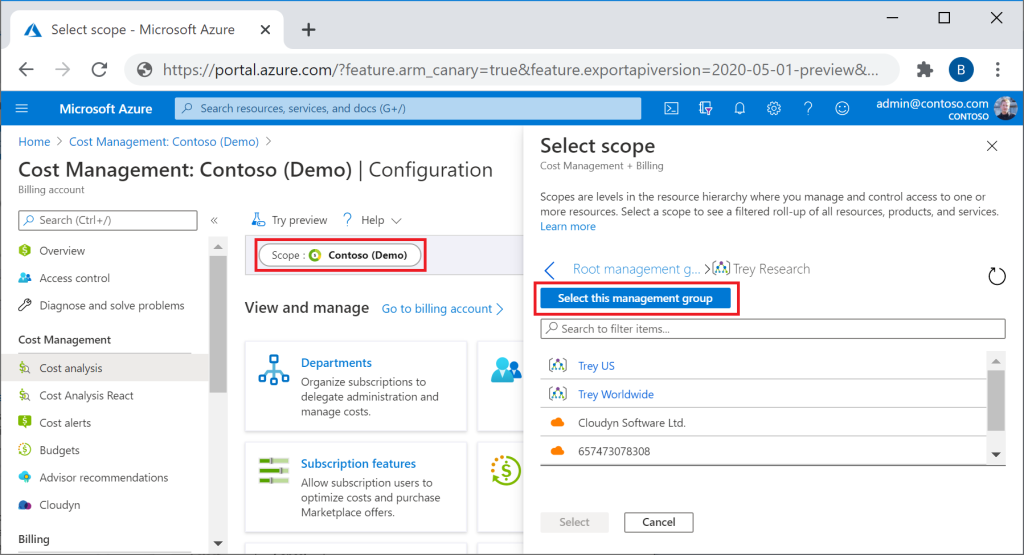
3. Select your scope: If you have access to multiple billing accounts, subscriptions, or management groups, you’ll need to select the appropriate “scope” for the costs you want to analyze. For monthly spending, you’ll typically select your subscription or a relevant billing account.

Step 2: Utilizing cost analysis for an overview
How to do it:
- Navigate to “Cost Analysis”: From the “Cost Management + Billing” overview, select “Cost Analysis” from the left-hand menu under “Cost Management.”
- Set the date range to “this month”: By default, it might show “Current month to date.” To see your full monthly spending (once the month is complete), you can adjust the date range to the specific month you want to review. For ongoing tracking, “This month to date” is excellent.
- Explore built-in views: Cost Analysis offers various built-in views like “Accumulated costs,” “Cost by resource,” “Cost by service,” etc. Start with “Accumulated costs” to see your overall spending trend.


Microsoft 365 productivity & collaboration solutions
Empower your employees to do their best work regardless of their location or device
Step 3: Deep dive with filters and grouping
To gain more granular insights, you can apply filters and group your costs by various dimensions. This helps pinpoint specific cost drivers.
How to do it:
- Add filters: Use the “Add filter” option to narrow down your costs. Common filters include:
- Service name: To see spending on specific Azure services (e.g., Virtual Machines, Storage, Azure SQL Database).
- Resource group: To analyze costs per project or team (if you’re using resource groups for logical organization).
- Tag: If you consistently tag your resources (e.g., by owner, department, environment), this is incredibly powerful for cost allocation.
2. Group by: Use the “Group by” option to visualize your costs broken down by a specific dimension. For example:
- Resource type: To see costs by the type of Azure resource.
- Service family: To understand spending across broader service categories.
- Tag: Again, if using tags, this is invaluable for team or project-specific cost reporting.
3. Change chart type (optional): Experiment with different chart types (e.g., column, line, stacked area) to best visualize your data.
Step 4: Setting up budgets for proactive management
Budgets are essential for proactive cost management. They allow you to set spending limits and receive alerts when you approach or exceed them.
How to do it:
- Navigate to “Budgets”: From the “Cost Management + Billing” menu, select “Budgets.”
- Create a New Budget: Click “+ Add” to create a new budget.
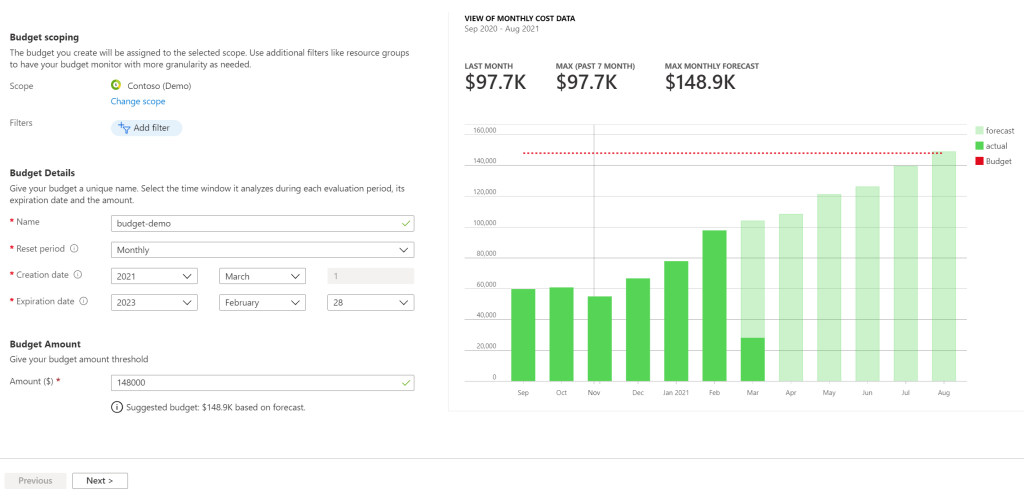
- Define budget details:
- Scope: Choose the scope (subscription, resource group, etc.) for which you want to set the budget.
- Budget period: Select “Monthly” for monthly tracking.
- Start and expiration date: Define the budget’s active period.
- Budget amount: Set your desired spending limit for the month.
4. Configure alerts: Add alert conditions based on actual or forecasted cost. For example, set alerts at 80% and 100% of your budget amount, specifying email recipients.

Step 5: Utilizing cost alerts and recommendations
Beyond budgets, Microsoft Cost Management offers various alerts and recommendations to help you optimize.
How to do it:
- Review cost alerts: Under “Cost Management,” you can review any triggered cost alerts. These could be budget alerts or anomaly detection alerts.

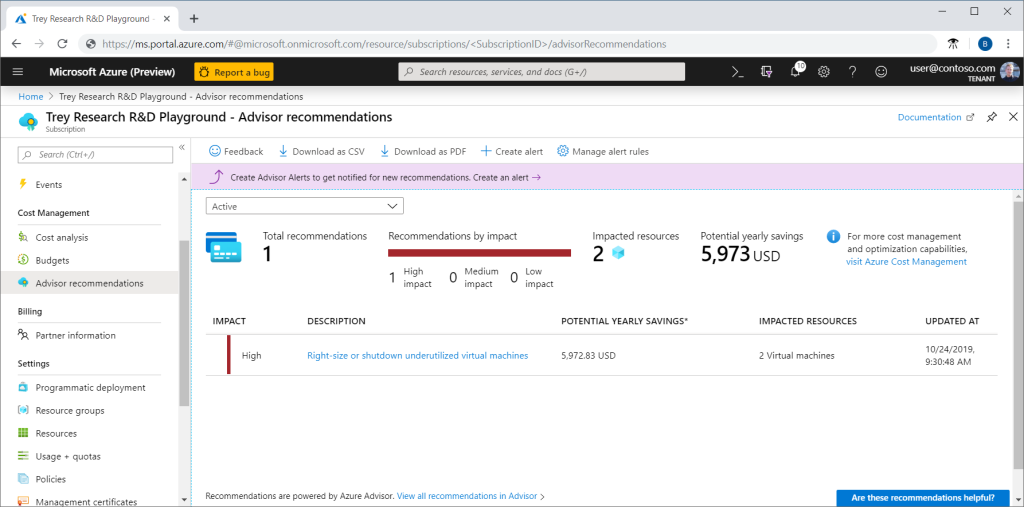
2. Check Azure Advisor for cost recommendations: Azure Advisor provides personalized recommendations for cost optimization, security, performance, and more.
- Navigate to Azure Advisor: Search for “Azure Advisor” in the Azure portal.
- Review “Cost” Recommendations: Focus on the “Cost” tab to see suggestions like resizing underutilized VMs, deleting unattached disks, or considering reservations for consistent workloads.

By integrating these steps into your routine, you can gain significant control over your Azure spending, ensuring your cloud investments are both efficient and aligned with your business objectives. Taking the time to understand and utilize Microsoft Cost Management is an investment that will pay dividends in financial predictability and optimized resource use.
Need help understanding or optimizing your Azure costs? Our team of experts is ready to assist. Contact us today to explore how we can help you maximize your cloud investment and achieve greater cost efficiency.

Sign up to learn more
Get news, updates, and insights about Microsoft solutions, technologies, and best practices.